By Melanie K. Nelson
To tell you the truth, as much as I love crafty things, I am not the most artistic person in the world. The good news is that I have learned tricks over the years to compensate for my lack of artistic ability and my crowning jewel is my Easter Bunny cake! This is the easiest cake and the kids love to help decorate it. *The pictures are from the bunny cake that I made with my family made last year. We are big chocolate fans so we chose to do a chocolate cake with chocolate frosting and sacrifice a little on the looks! The cake looks more like a traditional Easter Bunny when it is vanilla.
What you will need-
Ingredients:
- One recipe of your favorite cake batter
- Two recipes of your favorite frosting
- 2 bags of shredded coconut
- Green and red food coloring
- Jellybeans
- One piece of licorice
Supplies:
- One 9-inch round cake pan
- Two 4-inch round pans (or oven safe dishes)
- A cupcake tray
- One small piece of cardstock or cardboard (aprox. 8 x 5 inches)
- Flat serving tray or cookie sheet
- Wax paper
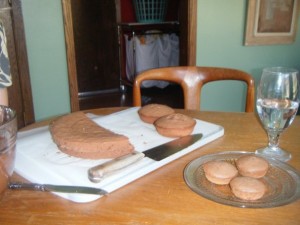
Step One Mix up your favorite cake batter and divide it between the 9-inch, the 2 4-inch pans and 3 cupcakes (these 3 only need to be about half full). Don’t forget to grease the pans, put wax paper in the bottom of the 9-inch pan and cupcake wrappers in the 3 used spaces in the tray. Bake the cakes according to the recipe but be sure to keep a close eye on them, the various sizes will take different lengths of time. Use a toothpick to test if they are done!
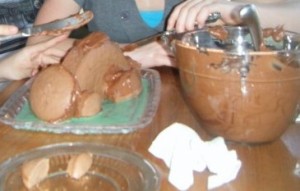
Step Two Once the cakes are cooled it’s time to assemble the bunny. First cover the center of the try with a thin layer of frosting. Next cut the round cake in half and frost the surface of one of the halves. Now, form the bunny’s body by lining up the 2 halves next to each other, flat sides down and frosting side on the inside to connect the 2 halves. Now that the body is assembled, frost the whole thing.
Step Three Now its time to make the cake actually look like a bunny. Attach all of the pieces with frosting. Take one of the 2 small round cakes and cut it in half, these are the back legs. Place them on either side of the body, flat side down, about an inch from the back edge of the cake. The other small round cake is the head, prop it on the opposite end as the hind legs. Next we have the cupcakes. The first one is going to be the tail. Position it opposite the head, in between the two hind legs. The other two cupcakes make the front paws. These go on either side of the body, about an inch back from the head. Now the bunny is completely assembled, cover everything in frosting and make it look pretty.
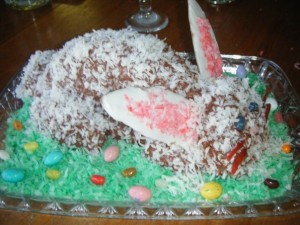
Step Four All bunnies need to be fluffy, so it is time to add the fur. Gently press the coconut in to the frosting to cover the whole cake until it looks like it looks nice and furry. Next make some grass by mixing a few drops of green food dye with enough coconut to cover the tray. Add frosting to the tray until it is all covered, then press the green coconut into the frosting on the tray.
Step Five The details really make this cake come to life. First cut ears out of the cardstock/cardboard. They should be about an inch wide at the bottom and 3 inches tall. Cover them in frosting. If you are really feeling crafty, dye a little bit of coconut pink (using a tiny bit of red food dye) and use the pink coconut in the middle of the ears. Next take the licorice and cut 4 thin strips for whiskers and stick them on the face. Find a pink jellybean for the nose and 2 blue, green or brown ones for the eyes. Scatter the rest of the jellybeans in the “grass” to look like Easter eggs.
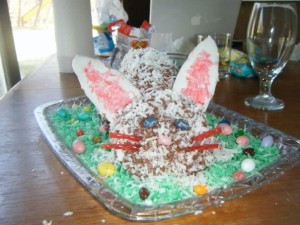
And just like that you have a super simple, adorable Eater Bunny cake that is sure to impress!